Over this past weekend, I received a call from a friend asking about some hiking dates and I realized that, wow, I haven’t been on a hike in probably two months! What happened? Life, obligations and some other fun stuff happened. But I’m overdue so I sat down last night and started thinking about the next hike and it occurred to me that this process just might be helpful to those new to hiking, and specifically new to hiking in New Hampshire’s White Mountains.
I’ve hiked a lot of mountains in the White Mountain National Forest, but in the past few years, I haven’t made it north as often as I used to or would like to. So what does this mean? It means I need to assess my cardio/fitness abilities and make that a crucial point in determining which mountain to tackle. I work out and practice yoga, but I haven’t kept up the cardio level necessary to climb 4,000+ ft mountains with ease. Perfect moment for yoga mindfulness — asking myself how fit am I NOW? When planning this type of hike, you need to ask yourself the same question, and answer honestly — it’s crucial to both enjoying the hike and remaining safe.
After honestly determing fitness level, it’s time to match it up to the trail/mountain.  My favorite book for getting a good overall assessment of a mountain and/or trail’s difficulty is Michael Lanza’s New England Hiking. And let me tell ya, when he labels a mountain “kick butt”, he means it! Don’t overestimate your abilities — allow yourself something easier to start. Way better to finish a hike an hour earlier than planned than realize you’ve got four hours to go and it’ll be dark in one. I moved from choosing my typical #5 (kick butt) hikes, and brought it down to #3’s — enough for some physical challenge, but still allow me to enjoy the day and ease me back into White Mountain hiking. I also wanted to look for hike’s that might offer me some type of views and determined that I’d like to start back in the Whites planning a roughly 5-6 hour time-frame, versus my 8-10 hours I used to do.
So, now that I’ve identified some possible hikes in Lanza’s book, it’s time to take out the AMC’s White Mountain guide and look at the topographic maps and descriptions. (Lanza’s trail descriptions are great and often detailed in the most helpful of ways, but I find that combining the Appalacian Mountain Club (AMC) Guide with his books provides me with the best expectations of what the hike will be like.) The AMC Guide is great because it does come with maps, which among other things, can help you figure out nearby camping and/or where you need to search for overnight accomodations, if you need to stay over. (Given that I now live close to Providence, driving up and back with a full day hike in between is just not practical.) The key things to look for between the two books and the maps are things like elevation gain and words like steep, scramble, trail footing descriptions, etc. There’s a big difference between a 4,000 ft mountain in which you gain 1,300 ft in elevation versus one in which you gain 3,500. (At least your quads will think so!) Pay attention to the map — how closely do the tick lines meet along the trail? Does the trail cross streams/rivers? Read the trail descriptions carefully for these details. Ask, “Am I comfortable scrambling over rocks? Or hiking along a trail with a steep drop-off? Do I want sweeping views? Or am I content with walking through forested areas?”
Hiking Supply Checklist
Now that a hike’s been chosen, there are certain supplies that must always accompany a day hike in the White Mountains. And some are things you might not think necessary, but the Whites are unpredictable (THREE weather systems meet over the White Mountains!) and it’s better to have supplies and never use them, then desperately need them and not have them. Here’s a list of things I never hike without (I’ve broken the list into “must have” and “optional”):
Must Have’s
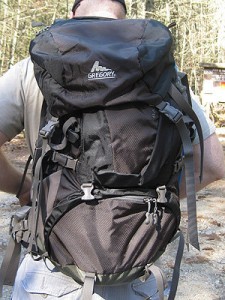
- Daypack or Backpack large enough to carry the list below
- Map. I highly suggest folding the map so your trail is visible and placing inside a ziploc bag. That way, if it rains, you can still read the map and not have it disintegrate in your fingers.
- Clothing: NO cotton — including underwear (it gets wet from sweat or weather and it stays wet setting you up for potential hypothermia even in the middle of summer. If it’s 90+ degrees out, cotton can feel great. Just make sure you have the non-cotton options in your pack!) Pants and/or shorts, hiking socks (I like some type of SmartWool), sporttank and/or non-cotton tshirt, fleece vest and an additional fleece or wool pullover/jacket. Rain jacket. Rain pants if you have them (if not, I suggest a second pair of pants/shorts in your pack.) Hat and gloves. (The wind/weather at the summit can be significantly colder than anywhere else on the trail. And if there is a view, you can’t enjoy it if you’re freezing.) Helpful tip: even wet, wool will keep you warm.
- Boots. Now, if you’re just starting out, it’s quite likely you won’t spend the money on a serious pair of hiking boots — and you shouldn’t, it’s quite the investment. BUT, I will say this, nothing beats a pair of good hiking boots for support, grip, and preventing wet feet. Personally, my ankles love extra support, so I tend for heavy duty backpacking boots. I’m still breaking in my latest pair — Asolo’s TPS 520 GV. :)))) Folks can hike in sneakers, just understand you will need to move more carefully, especially over rocky terrain.
- Two to three litres of water either in a hydration system like Camelback, or reusable Nalgene or stainless steel bottles. IF you bring a plastic water bottle, just remember to pack out whatever you pack in!
- Emergency blanket. This is small and cheap and a great piece of gear to put into your pack. May you never need to use it!
- Headlamp or flashlight. This is a crucial piece of gear. The best day hike planning won’t have you out on the trail after dark, but the worst White Mountain weather could derail the best laid plans in about two seconds. Make sure you have extra batteries, too! Here’s a great article on how to figure out what type of light will fit you best.
- Food: You WILL eat more than you think. Plan for some snacks you can eat along the way (trail mix is a great high protein, high carb, high fat combo that will keep you going. A small handful of trail mix does the trick along the trail.) Basically, whatever you like to eat that won’t perish too quickly is usually fine. I tend to pack my sandwich or wrap in a ziploc type bag so that I can then use it to hold trash after lunch. Fruit/veggies/sports bars work well. I tend to plan to eat a good breakfast before I start, a morning snack, lunch, and an afternoon snack. If your hike is quite long, you might want to plan dinner, too.  This article is more about backpacking food, but it might get you thinking!
- First-aid kit … of some kind. Even the basics of band-aids, some type of anti-bacterial ointment, ibuprofen are helpful to have. A lot of outdoors stores sell small backpacking first-aid kits. I’ve used mine numerous times for things like removing splinters, treating blisters or small cuts, even pulled out the ace bandage once for a hiking companion. And if you, or someone in your group has an allergy to something, especially if it’s serious, make sure you carry the means of dealing with it!
- Sunscreen/bugspray. You’ll be happier if you bring it.
- Toilet paper/tissue. Now, if you’re bringing this, you need to be prepared to dispose of it properly. The best way? Pack it out. Again, ziploc bags are your friend. IF you plan to bury waste, carry the proper tools and do it properly! There’s no one to clean up after you out in the woods! Nothing is more unpleasant than to be on a trail and come across discarded toilet paper. BLECH. Unsure about any of this? Great book on the topic: How to Shit in the Woods, Second Edition: An Environmentally Sound Approach to a Lost Art by Kathleen Meyer
Optionals
- Gators
- Water filtration system or tablets. The biggest issue with drinking unfiltered water in the Whites is encountering something like giardia. However, if it comes to drinking unfiltered water or not drinking water at all — drink the water, giardia is treatable.
- Trekking poles
- Compass. Some would say this is necessary, but it’s only helpful if you know how to use it.
- Whistle. Mine stays tied to the should strap of my pack. If something happens and you are off trail/out of sight, anyone looking for you will hear the whistle long before they hear your voice — especially if you’re hurt.
- Bandanas. Handy things! I keep one tied to my pack’s shoulder strap to mop up sweat. I keep a couple extra in my pack. If it’s HOT, one tied around the head also keeps sweat out of the eyes. Could also work as a bandage if ever needed.
- Camera
- Journal and pen
Staying Overnight?
Check the Weather
It’s always a good idea to check the weather before you head out. Some folks are fine with hiking in light rain, fog or otherwise inclement weather. But if driving rain and dropping temps aren’t your thing — or you don’t really have the best gear for it — postpone your hike. The Mount Washington Observatory has local and up-to-date weather conditions.
Tell Someone Where You Will Be Hiking!
Even if you are hiking with others (and in the White Mountains, a group of three or four is ideal. If you MUST hike alone, and it’s never recommended, stick to popular trails where you will not be alone. Just think what would happen if you twist your ankle. DON’T rely on cell phone coverage to get you out! Most likely you won’t have any signal!) you ought to always plan to leave your plan with someone else and check in with them when you have safely completed the hike. If anything happens, this person just might be the one to send the right folks out looking for you. And if you DO decide to change plans, tell or text someone before you start. Even if it’s the folks at the Visitor’s Center.
Have FUN


Thanks of the how to. Going there soon with trekking poles!